Welcome to my Website!
You'll find quite an amount of material in this catalogue, like in others. Let me differ this one from all others by giving you some background about the man who designed those plans.
The plans in this catalogue are designed by Paul Janssens. Paul started flying in in the Belgian Air force and became a civilian pilot later. He currently lives in France and works as a test pilot.
Paul has designed numerous PSS planes and his designs are well proven. All planes will allow modellers with some experience to build the model. Building instructions are available in Dutch and English, and are very detailed. You may know of these plans trough international modelling magazines, such as QFI (United Kingdom), MRA and FLY (France), FMT (Germany), Modellistica (Italy) and Radio Control (Holland). All of these magazines have published a number of the plans.
In 2016 Paul quit his plan business and we agreed that I should take over. My name is Maarten Werner. I started to fly model gliders at the age of 10 and never quit. My aim is to continue to distribute Paul’s designs and to keep his work alive. Currently a lot of modellers fly ARF slope models. The reward of flying a scratch build PSS model is a lot greater though. Paul’s designs got me into building fuselages with the lost mould method. Some people shy away from building glassfiber fuselages. I did too, at first. Now it is my preferred method of building, cheap and fast.
I would like to encourage you to try one of the planes from my catalogue. You will not be disappointed!
Best regards, Maarten Werner
P.S. For more information on PSS check out the PSSA Online website: http://www.pssaonline.co.uk/
Build Methods
1 The Lost Mould method
Paul has developed this method into a succesful process that enables me to build a fuselage of any shape in a day's time. the method is easy, low cost, fast and light, I still work with balsa, it's such a nice material, but the lost mould technique saves such an amount of time and money that it cannot be ignored.
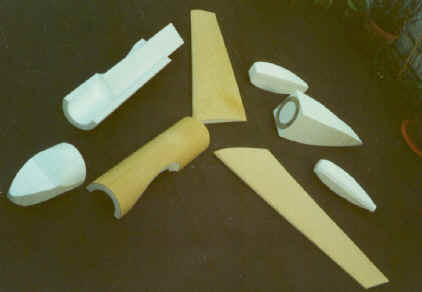
STEP ONE. Here's the recipe: First we'll cut the fuselage out of a foam block. The foam must be dense. I prefer to use green BASF Styrodur. White foam of 25 kg / cu.metre, or blue foam will also work, the white one is less expensive.
Use Cardboard and cut out the fuselage side and top templates twice. The foam block is then made up and cut to size. Use pins to fix the top and bottom templates onto the foam block and make sure that they are well aligned. Now the foam can be cut. I use the same hot wire that I use to cut my wing cores. Remove the templates and repeat the process for the side view templates
STEP TWO. Our fuselage is now correctly shaped in two dimensions, the third one is added by sanding. Don't worry, because of the density of the foam it'll sand just like balsa, there is also the same amount of dust, but this is statically charged so wear an overall. Use a 150 grit paper for the shaping, and a 600 grit to smooth the fuselage when you're satisfied with the result. Most fuselages are round, and you can speed things up by cutting off corners with a sharp knife before sanding.
It's a good idea to have some photo's or better still a plastic model of the aircraft you're making. It helps you to get the shape right during the sanding. Remember that this is the stage at which the final shape of the fuselage is determined.
STEP THREE
After smoothing the entire fuselage it has to be covered with plastic heat shrink film or brown plastic parcel tape. You can use an iron to smooth out the tape much as you would for Solarfilm. There are several reasons for this covering :
1. It keeps the resin from penetrating into the foam, and thus keeps the final weight of the fuselage down.
2. It gives the inside of the fuselage a smooth surface, so it's easy to install bulkheads and the radio gear.
3. It prevents the foam mould from beïng dissolved while putting on the glassfibre if you're using polyester resin.
The choice between polyester and epoxy is upto you. My experience is that polyester dries faster than epoxy, is better for your health and smells worse.
STEP FOUR: The fuselage is now covered with a coat of de-moulding wax, any floor wax will do. Next give the fuselage a mist of 3M77 contact spray glue. Now the fuselage is covered with two layers of 160 grams / sq.metre glassfibre cloth and resin followed by a final layer of 80 gram cloth. An hour later apply a thick coat of thick microballoons and resin.
STEP FIVE: The next day you can cut away any excess glassfibre, and sand the fuselage to obtain a smooth surface, use a 150 grit to start with and smooth it with 600 grit and water. Be careful not to sand into the last layer of glasscloth or tissue, only the microballoons should give you a smooth surface.
Now you can remove the exposed tape and pour in some acetone to dissolve the foam. The rest of the tape can now be pulled out of the fuselage. That wasn't too difficult was it? Finishing is now just a matter of spraying up in the usual way.
STEP SIX: Now you have to keep in mind that there may still be some wax inside your fuselage. So every time that you need to glue anything into it you have to roughen it up with sandpaper.
VARIATIONS The mind of a modeller is ingenious so you may well be thinking about how to improve or further develop this technique. Firstly, you can use exotic materials in high stress areas to strengthen the fuselage. Kevlar put on as the second layer will help cloth or unidirectional carbon tapes. Another variation for airframes where weight is less important than strength is to epoxy the glass cloth directly over the foam and only extract enough foam for the equipment installation. This would also allow one layer of 160 gram cloth to be deleted. You'll find that this method opens up a whole new world, there isn't an airframe that you cannot build. It might not be as much fun as working with balsa, but if you need to produce odd shapes at a good rate this is it !
2 All Foam Method
Foam is cut using templates, is then veneered and used to build up the airframe, small parts may be covered with glassfiber.
Foam is cut using templates, is then veneered and used to build up the airframe, small parts may be covered with glassfiber.
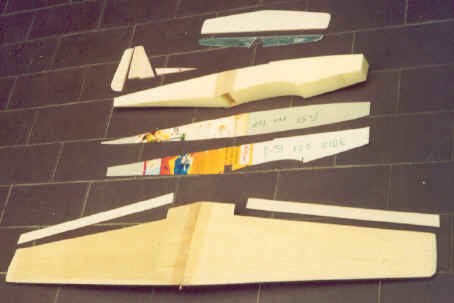
3 Foam - Veneer - Balsa Method
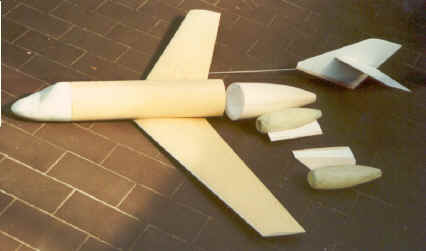
The quickest method to build a fuselage. The core is cut out of foam, and balsa sides are glued onto this core, later the fuselage is sanded to shape. The resulting airframe is light, very strong, and low cost.
The quickest method to build a fuselage. The core is cut out of foam, and balsa sides are glued onto this core, later the fuselage is sanded to shape. The resulting airframe is light, very strong, and low cost.